
Ideal Light - When is the best time of the day for shooting?
/
Light is the main ingredient in any photograph. So when is the best time of the day to capture this light? During...
Read MoreLight is the main ingredient in any photograph. So when is the best time of the day to capture this light? During...
Read MoreThese days, with everybody wielding expensive professional photography gear it is easy to think that in order to make better images you’ve got to have better gear. If you think this way you would be far from the truth. For as long as photographers have been shooting, the eye for a great shot, the understanding of finer details as to what makes a shot stand out from the average ones has remained the benchmark of good photography. Better gear comes a long way after. You can replace expensive gear with cheap cameras and still manage to get good images. But if you don’t have photographic vision, you will never make great images; regardless of the gear you own.
So, how can one create better images? In other words how does one acquire the power to envision an image? Here are five tips that should help you –

This is easier said than done and takes a considerable amount of practice. When you hear a professional photographer speak about developing your vision, what s/he invariably suggests is to know how to make unique images of a scene using your tools, until that becomes your signature style. Great photographers such as Ansel Adams, Josef Koudelka, Robert Capa and Fan Ho all have their own signature styles. A significant part of that style is attributed to using a single lens and seeing the world as it unfurls through it. When used over a period of time, like the memorable combination of a Leica 35mm and 50mm prime used by Henri Cartier-Bresson, the lens becomes an extension of your eyes.

Look at the above image. The partially open window is placed towards one corner while the rest of the image is dominated by an empty space. This empty space is known as negative space. Invariably when you look at the image your eyes tend to roam around the vast emptiness and then come back to be fixated on the window. You may even start to look for details, the three potted plants, and the crochet work on the white curtains. This a clever way to focus attention of the viewer to the important aspect of an image which the photographer wants to highlight. Negative space simply helps him to achieve that more easily.

Some compositions are best expressed in monochrome. Devoid of colors an image lacks the elements that sometimes be distracting. You can shoot in color and then post-process in black and white which gives you a greater tonal range. Black and white compositions have often been found to be more powerful than color. Back in the early days of photography when film was the dominant format for shooting, everybody had to shoot in black and white. Color film came much later. Photographers in those days relied heavily on compositional aspects to convey depth and dimension. Sadly, these days, the brilliance of colors often hide poor compositions.

Repeating patterns and or shapes help you create a sort of order in an image. The human brain can perceive repeating patterns and shapes as something that makes sense. That is why repeating patterns in music create rhythm; and rhythm is harmony. In photography, when that same harmony is broken it becomes a point of interest in an image.

Lines, be it straight, crooked or curved has an effect on your images. I have already discussed the importance of using leading lines in a previous article on this website. Leading lines tend to draw the attention of the viewer towards the main point of interest in an image. Diagonal lines, especially those which travel from the bottom left of the image to the top right add an interesting dynamics to an image. I had discussed perfectly straight horizon lines in an earlier image. Such perfectly straight horizon lines can induce a sense of tranquility to an image. Lines which seem to be falling over adds a bit of tension in a composition. E.g.; a tall building shot with a slight tilt induces tension in the image. Curved lines on the other hand are frequently used as leading lines in composition.
The above tips are just a few ways to improve your photographic vision. Photography, however, is more about the practice than theory. What you learn on the internet or at a workshop has to be put into use to refine and then to adapt. Your style evolves over time as you shoot more and learn to make better images.
If you enjoyed reading this article and would like to know more about another photography theme, please feel free to let us know here >
Alternatively, you may subscribe to my newsletter for receiving weekly news from the blog in addition to keeping you updated with my courses' availability.
Additional Reading
Light is the main ingredient in any photograph. So when is the best time of the day to capture this light? During...
Photography is a two-dimensional projection of a three-dimensional reality and remains a constant challenge to convey the same sense of depth in our photos. Hence, photographers...
While photography is being more and more accessible to everyone it has never been so important to take unique photos with an unusual perspective. With everyone shooting from a similar ‘view point’ everyone’s image is going to look alike. Hence, it becomes imperative to scout for rare locations to create unique images. In the 21st century, as a photographer, the biggest challenge is no longer how to make an image but how to stand out from the crowd by making distinctive images.
Vacations happen to be a time when the long lost camera all of a sudden becomes our best companion. They are cleaned, charged and primed for action. But more than half of the images shot on a vacation turn out disappointing. Poor composition is the primary reason. But it can also be bad lighting and incorrect exposure settings. The following tips will help you to realize some of your composition mistakes even before you make them and that way help you make better travel photos.

Scale means when you have something in the photo that gives you a comparative reference of how big or small the scene / subject is. Let’s say you are photographing a beautiful landscape. It’s beautiful as it is and everything is perfect but without a point of reference the viewer has absolutely no idea how big the place is. What you need to do is allow someone to walk into the shot, just so that you can use that person as a point of reference. As a matter of fact, that individual will also become what is known in photography as the focal point or point of interest. The sweeping landscape and everything around that person simply converts into negative space. The viewer’s eye will invariably wander around and then get fixated onto the individual.

If you hear a National Geographic photo editor describe what makes a great photo worth publishing on their magazine, you would invariably hear him/her say that the picture must tell a story. Random captures often don’t have the value and depth in them which can capture the imagination of the viewer for long. Only when you go above and beyond and is prepared to go the extra mile in order to capture an unfolding moment will you ever achieve that in your photos. Sometimes the difference between a god photo and a great photo is simply is simply to include people.

One way of capturing people, and this is only for those who would love to go the extra mile to capture a sense of the place they are visiting, would be in the act they are. I make it a point to visit the local market whenever I go to a new place. The market happens to be the most authentic place where you can really feel the pulse of the place. People buying essential supplies, busy going about their daily routine, vegetable sellers, fruit sellers, cyclists, pedestrians, sign-boards - it is a treasure-trove for those who love shooting street photos. I am not an ardent street photographer, but I have seen markets are one of the best places I can practice a bit of street photography and in the process capture off-beat images of the destination I am in.
Photographing people at close quarters can be a problem in some places. Additionally, if you are like me it is a disconcerting thing for the first time. If you are unsure approach the person and ask whether you can take a photo of him/her. Explain that you are a photographer and you found him/her interesting and would like to take a picture for your collection. If you are just a casual travel photographer, which most likely you are, you can explain yourself and the reason you are taking the picture and most of the time it would be fine. It is all in the approach. A threatening and aggressive approach or a creepy approach would definitely be met with resistance. A smiling face can often mitigate the reason to worry.

Albeit what has been said above be aware of the local customs and practices. In some cultures aiming your camera at people is considered rude. In most western countries you are fine photographing anyone as long as you are standing on public ground and the person you are photographing is also on public ground. But always be careful photographing children. In any case, you don’t always need someone to be facing the camera to be included in the shot. This is especially when all you need is just a point of reference. A person sitting facing away from you is just as fine.
Next time when you are out snapping photos, pause for a moment and think if adding a human element would add to your composition.
If you enjoyed reading this article and would like to know more about another photography theme, please feel free to let us know here >
Alternatively, you may subscribe to my newsletter for receiving weekly news from the blog in addition to keeping you updated with my courses' availability.
Additional Readings
Light is the main ingredient in any photograph. So when is the best time of the day to capture this light? During...
Photography is a two-dimensional projection of a three-dimensional reality and remains a constant challenge to convey the same sense of depth in our photos. Hence, photographers...
If you are new to action photography, want to gain some experience and maybe planning to build a portfolio, what can you do to take better action shots?
Having an understanding of the elements that make-up an action shot, knowing how and when to manipulate them, will ultimately elevate your skills and capabilities to successfully capture one.
What would a true sports photographer take into consideration for making an action shot?
A sports photographer will get the shot they want as they see it, of the action they need to report on, every time. Their ability to combine the correct exposure, composition, focus, and amount of blur in the background derives from their knowledge and understanding of the elements covered.
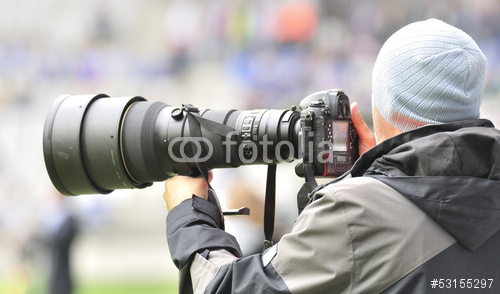
First rule of photography is to know your gear like the back of your hand. At all times you will have to be on top of your game and knowing the tools you possess and would be using is an essential pre-requisite. It isn’t any different in sports photography either. Your camera, whether you own an entry-level or top of the line DLSR, has the ability to take amazing action shots.
You need to take your camera out of the Auto mode so that you get the results that you want when you push the button. First you will need to tweak the way your camera focuses, by allowing continuous focus tracking, then adjust the focus point on your camera to be focusing on the right spot. Second, set your camera to take multiple frames per second, having more options to choose from after the shoot is always better. Controlling the shutter speed and aperture so that you can blur the background or freeze action, allowing you to get the shot you foresee. And final consideration should be given to your ISO, so that it’s optimized to yield the best quality of image possible.
The 18-55mm kit lens will not do. You need something with a longer focal length like the 70-300mm or anything beyond the 200mm+ range will do just fine. The longer focal range you have the better, as you get really close to action. Inherently, telephoto lenses have tendency to render blurry backgrounds, that comes in handy with action photography. You should aim at keeping the interest on your subject reducing distractions in your frame and telephoto lenses can help you achieve that.
Before you can be a good sports photographer you have to be a fan of the game. Understanding the sport is the first step. Now if you don't understand the sport you are likely to be aiming in a direction that would never yield a significant capture. Your ability to read the play and anticipate the moves will ensure more unique and winning results.

ensure Great action comes from knowing the game and anticipating the moves. Let's say you are covering a soccer game. Five minutes into the game you realize that the home side striker has a tendency to make a long incisive run in to the opponent's box. You prep yourself for the next opportunity. As soon as the striker makes his next move you pan with him and make an off-center composition leaving considerable amount of negative space in the frame. Personally, i prefer the shot where the athlete has some space to travel to, making sure he/she is the main focus of the composition.
With all the action happening in front of you, you may argue that there are literally not enough time to look around. However, at time images that are off-topic can really become as they say the catch of the match. A WAG blowing a kick to a goal scorer on the pitch, a fiendly hug to an opponent player after a tackle or a section of the crowd cheering for the home side are all but off topic compositions but nevertheless interesting.
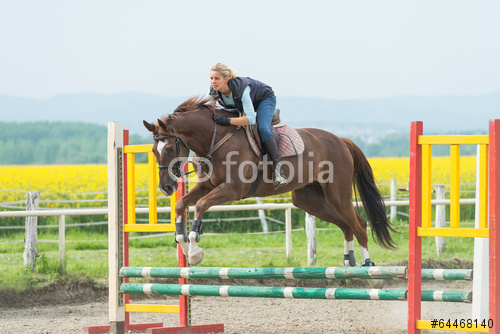
This is my favorite part – freezing the action. Freezing the action means when you use a significantly fast shutter speed to stop things in mid-flight. A cyclist making a 360 ° roll while jumping over a dune, a steeplechaser jumping over an obstacle, a horse in equestrian in mid-flight over an obstacle or even a soccer striker netting the ball are dramatic moments that can only be captured when you freeze the moment. In other words you have to use a fast shutter speed and fire a number of exposure in quick succession.

Blurring the background is a requirement that comes from the need to isolate a subject from the background. Normally you would want to show the background because at the end of the day that’s more attractive. But sometimes blurring can create dynamic images by suppressing anything that does not add to the image and highlighting only which is important.
If you enjoyed reading this article and would like to know more about another photography theme, please feel free to let us know here >
Alternatively, you may subscribe to my newsletter for receiving weekly news from the blog in addition to keeping you updated with my courses' availability.
Additional Readings
Light is the main ingredient in any photograph. So when is the best time of the day to capture this light? During...
Photography is a two-dimensional projection of a three-dimensional reality and remains a constant challenge to convey the same sense of depth in our photos. Hence, photographers...
Deserts can be an extremely gratifying subject to photograph if you know what you are doing. On the flip side, however, they can be an extremely difficult subject, one that can hover on the point of frustration, if you are unsure about what you are doing.
Most photographers make the mistake of not choosing the right time to photograph deserts. This means in all probability the light in which they shoot is never ideal. Then again, they almost never shoot with a tripod. Add to that a bunch of other compositional mistakes and all of a sudden desert photography becomes a challenge. Well not anymore. As this article will show you how it’s done with little planning and using the right approach.

It is no secret that professional photographers love shooting at the early morning and late afternoon light. They call it the golden hour, seemingly because the light has a beautiful golden tone to it. This light travels almost horizontally to the ground. It can often bring out lines, shapes and contours that are otherwise flattened during the harsh light of the mid-day sun. The presence of shadows can accentuate a form and give it dimension. At the same time an image becomes more contrasty when it has shadows.

Sand dunes, by themselves can be extremely boring as compositions. Miles after miles of sand dunes, unless the wind-crafted contours form the focus of attention, isn’t going to make an interesting image. Instead find something in your image that is going to break that monotony. One example would be to catch the full-moon in all its glory. Other examples could be a car or camel or even the lonely silhouette of a man.

Speaking of contours on the sand, they can be a fascinating thing to photograph when you know what you are doing. Shooting from a high angle, such as your eye-level, will not be enough. You will have to shoot from a low angle, and use those contours on the sand as leading lines. Shooting from a low angle allows you to emphasize the subject, which in this case are the delicate contours on the sand.
You also get to emphasize the vastness of the place. It is often the responsibility of the photographer to photograph a scene in such a way that the scale and the grandeur of the place is properly transmitted through a two dimensional capture. It is a difficult ask no doubt but not completely impossible.
Speaking of perspectives and camera angles, often changing the camera angle can really do the trick. Try to get into a position where you can get a completely fresh look at things. Shooting from the window of the car or from the eye-level standing up will only get you what everybody else gets. Instead climb to the top of a dune or over a rock formation and get a better view of things.

The deserts, when they are absolutely calm are one of the best places to shoot stars. If you ever wanted to shoot a sky full of stars at night this is the place to be in. There are a few things to note if you attempt at shooting stars. Use a pretty high ISO number, something like 3200 to start with. You need to be able to capture a lot of light in a short time when shooting stars. Set the white balance to auto and of course shot in RAW.
Your camera’s auto-focusing will be haywire because it won’t have anything to help you focus on in the absence of light. So, switch to live-view and manual focusing. Use the smallest f-stop and the shortest focal length you can. Manually turn the lens to shoot at infinity (if your lens has a focusing distance indicator the infinity symbol will be like a sleeping 8). Don’t worry about out of focus stars. At that distance it won’t matter at all. A bit of post-processing would be required after the image has been made.
A final word on safety. Sand and electronic devices don’t go well together. If you have sand in your camera it can be curtains unless you get it off the camera immediately. So at all times be extra careful when shooting in sandy conditions. When camera is not in use cover it with your lens cap to protect the front element of the lens. Carry a plastic resalable bag or a weather jacket for protection in case of sand storms which can often come with no warnings.
If you enjoyed reading this article and would like to know more about another photography theme, please feel free to let us know here >
Alternatively, you may subscribe to my newsletter for receiving weekly news from the blog in addition to keeping you updated with my courses' availability.
Additional Readings
Light is the main ingredient in any photograph. So when is the best time of the day to capture this light? During...
Photography is a two-dimensional projection of a three-dimensional reality and remains a constant challenge to convey the same sense of depth in our photos. Hence, photographers...
Photography learning website. Courses & workshops dedicated to photography newbies and enthusiasts in Doha, Qatar


